Pages

Wednesday, September 29, 2010

Labour of Love - Egg Pasta from Scratch!

It is amazing what conveniences the modern world now offers for cooking. Gone are the days when one had to slave away at the stove making chicken stock with messy bones and carcasses. Gone are the days when one had to grind sambal paste by hammering away with the pestle and mortar. Gone are the days when one actually knew what raw ingredients went into the curry, chopping, dicing and slicing away. All one needs now is a Knorr cube, a packet of Adabi and a bag of Baba's. Easy peasy. But with all this convenience, we are also slowly losing all that wonderful cooking lore. Some of this knowledge has even been handed down through the generations within the family, like some super-secret martial arts which will blow all your enemies away if you execute that last deadly stance ala Buddha’s Palm a.k.a. Yi Loi San Jiong.

Since I started baking and cooking more frequently, it has been quite an enjoyable ride - finding out what actually goes into that cake which I have always loved to eat, learning how certain spices or herbs creates that distinct flavour, exploring the wide variety of cooking techniques out there and realizing that not everything can be produced via stir-frying Chinese style...There just seems to be an endless array of stuff to try out...

So, last Thursday, when I wanted to have some pasta for dinner, I decided that I should try making egg pasta from scratch instead of buying it off the supermarket shelf. The whole recipe seemed sooooooo simple. Flour, eggs and salt - that was it. But the one question that made me doubt whether it would be a successful venture was this - how in the world I was going to shape the dough? Without a pasta maker a.k.a pan mien machine, shaping the actual pasta strands would definitely be a challenge.
Kneading the dough

As I was mixing and kneading the dough, various options came into my mind...
Option 1: Follow the recipe instructions where I had to roll out and flatten the dough paper thin, fold and cut into strips, then unfold the strands.
Option 2: Follow another recipe where I basically take pieces of dough and hand roll it individually into long strands.
Option 3: Pull the dough "la mian" Chinese noodle-style – my own bright idea.

What actually transpired was this. I started with Option 1. Then, because I was too impatient and did not wait for the dough to dry out enough, some of the dough stuck together after I folded it for cutting. Which meant I couldn’t unfold the strands if I continued cutting! After finally managing to undo the disaster and hacking off the lumpy parts, the matter was resolved by cutting the dough into strips individually and skipping the folding step altogether. This took more care and precision, but it got the job done at the expense of an achy back. If Ultraman wasn't around to assist with this tedious process, I think I would have just randomly chopped everything up!  As for the remaining lumpy dough, I tried a combination of Option 2 and 3. My “la mian” technique didn’t quite work out because the dough kept breaking – it just wasn’t elastic enough. I ended up rolling out individual strands, which I then pressed and stretched flat with my fingers. The results were pretty sad-looking....
Cut pasta

It didn’t even seem like there would be enough for everyone at dinner. I was beginning to regret not getting that convenient packet of pasta from the supermarket. After letting the pasta rest for about 15 minutes, I collected all the strands together and surprise, surprise....when bunched together, it actually LOOKED like proper pasta, and not just mis-shapen lumps of dough!
Pasta strands collected together

Thus encouraged, I forged bravely ahead to cook the pasta and make my sauce.  Making sure I did not overcook the pasta (handmade ones cook much faster than the store bought packets), I then drained, tossed it in the sauce and grated the parmesan. Voila! 
The final product

The pasta turned out smooth, firm, chewy and pretty darn yummy (blowing my own trumpet here...).  I felt such a strong sense of kinship with those Italian chefs who had been making pasta by hand for centuries that I nearly burst into a rendition of "O Sole Mio".....The masses at dinner got fed, everyone was happy and I was ready to take on the world!

Wednesday, September 22, 2010

Happy Mid-Autumn Festival!

Mid-Autumn Festival a.k.a Mooncake Festival a.k.a Lantern Festival is here again!  Time really flies - it is already September and there are only 3 months left to the year!  Mid-Autumn Festival was never really a big thing in my family.  We didn't perform any prayers nor did we have any big family dinners.  What we did have, though, were wonderful lanterns and loads of mooncakes. 

My most memorable lantern was an impressive peacock shaped lantern with long tail feathers and glittery powder sprinkled all over.  It was made from a simple wire frame and that thin translucent paper, complete with a bamboo stick handle.  It sucked at keeping the wind out and frustrated me no end when my candle kept blowing out but it was gorgeous when lit.  My siblings and I used to have a field day lighting candles and parading around the garden searching for the darkest corners to shine our beautiful lanterns on.  Not to mention dripping wax everywhere and giving my Mum a massive clean-up job! Nowadays, kids are carrying around sterile, battery-operated Doeramons with Dr. Bombay's Taxi song (which coincidentally was my nephew Na-Na's lantern du jour....) stuck on repeat!  You do remember Dr. Bombay and his "Cal-cu-tta, I am a taxi driver in...Cal-cu-tta!" don't you?  The song is stuck in your head now isn't it?  Ha ha. OK, I admit my nephew Na-Na is about 2 years old, so he can't be lighting up matches and all that.  But you get my drift....having fun used to be REALLY fun!

Mooncakes too used to only come in two basic variations : Tow Sar (Red bean paste) or Lin Yung (Lotus paste).  The only configurable attribute was whether it came with or without yolk.  The Lotus paste with yolk was, and still is, a personal favourite of mine.  I used to be able to fill myself up with quite a fair bit of the stuff - alas, with a declining metabolism and an increasing fear of heart attack, I've cut down quite a bit nowadays.  The variety of mooncakes available these days are astounding.  Jasmine, Durian, Pumpkin, Green Tea, Hazelnut....even savoury ones with Chicken Floss, Mushrooms, Sambal...And you can get it in traditional mooncake skin, snowskin, and even ice-cream versions...Utterly mind-boggling!  I'm still a traditionalist when it comes to mooncakes, so I'm quite happy with my Lotus Paste, thank you.  But when I came across THIS while I was innocently surfing the internet, I have definitely accepted the fact that times have indeed changed!


Happy Mid-Autumn a.k.a Mooncake a.k.a Lantern Festival everyone!

Tuesday, September 14, 2010

The Chiffon Challenge...

FOREWORD : Since my last posting on Tibet, I just did NOT have time to write anything else!  Was so busy baking Raya cookies for sale and getting called up by my boss for some unexpected work that I just didn't have time to update the blog.  Well, thought I'd post an old entry which I had written some time ago in the mean time...

I have a soft spot for chiffon cake.  It is such a light and fluffy concoction that I can easily finish the whole cake in one big binge.  It really takes a lot of willpower to stop.  I always try to reassure myself that I was not overeating because when I squish the cake between my fingers, it practically vanishes and transforms into this teeny tiny little wedge.  So how can I be over indulging right???  Funnily enough, the idea of making a chiffon cake did not strike me until I came across a chiffon cheesecake recipe by Alex Goh.  It looked easy enough, so I thought I'd try it out....

1. Attempt number 1...I didn't even bother to take pictures cause it turned out so bad.  At that time, I attributed it to the fact that I did not have a REAL chiffon cake pan.  As a substitute, I had used a springform tin with a tube bottom, hoping to achieve the same look and feel.  DISASTROUS - Enough said.

2. Attempt number 2...I was so sure that my first cake turned out like a squished doughnut because I did not use the right pan, that I went out and invested in the real deal - a 9inch chiffon cake pan.  Nothing could go wrong then right?....How absolutely wrong I was.  The cake came out of the oven looking extremely promising.  I was so proud, I even stopped to take photos, thinking that I could post my success story on the blog and gleefully announce that I succeeded in making one of my favourite cakes. 
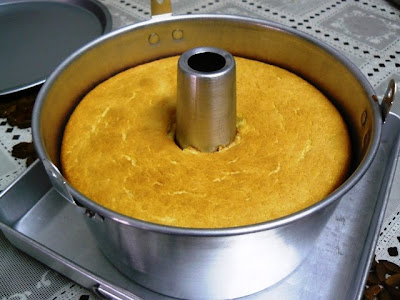
Attempt no. 2 - Looking promising in the beginning....

Alas, it was just a fleeting moment of triumph as the cake started deflating almost immediately.   Again, I ended up with a squished doughnut... 
The sad looking results....

This time however, I told myself to suck it up and documented the results anyway.  So my friends, this is how the cake is NOT supposed to look like....I was eating humble pie by then but was now doubly determined to get the darn cake baked right.  As advocated by Ultraman, staunch Google supporter, I googled for tips and tricks in making a chiffon cake.

3. Attempt number 3...After consolidating all the data I managed to find via Google, I was ready for my third attempt.  Since I was fearful of having to consume yet another squished cake, I decided that I will attempt a different recipe this time - a pandan chiffon cake recipe by Amy Beh.  At least, I get to eat a new flavour of doughnut if things turned out badly.  Repeatedly muttering the Google how-tos and not-tos under my breath, I made the batter and popped it into the oven.  The cake came out looking like good - I was excited.  But I had learnt my lesson in the last two attempts - you never know with a chiffon until it has been completely cooled and removed from its mould. 
Attempt no. 3 - Cooling and looking good...

So, it was with some anxiety when several hours later, I attempted to remove the cake....Mum hovered about, dishing out remarks like "Aiya, not so easy to make la...it'll probably deflate again....".  Now before you think that my Mum was not very encouraging, let me put things in perspective.  She felt it was better to lower expectations so that if things turned out badly, you were ready for it!  And if things turned out good, why then, it is a bonus!  And so.... TA DA!!
Looks good!

Yay! A chiffon cake which looked like one!  There was still a bit of problem with too much moisture on the top of the cake (which after overturning the mould, became the bottom of the cake), which I suspected was due to condensation.  But the cake was soft and fluffy, and tasted good enough.  In less than a minute, half the cake was gone! Yummy!

While I don't quite know exactly which troubleshooting tip actually helped, I am narrowing it down the following how-tos and not-tos....which, if you ever attempt a chiffon cake, you could keep in mind...
1.  Chiffons usually consist of a batter made with the egg yolks, after which whisked egg whites are added.  Always whip up the eqq yolk batter FIRST, then whisk the egg whites.  This is because whisked egg whites cannot retain the structure for long, so it makes sense to get your egg yolk batter ready so that you could just add the whites once it is whisked.
2.  Always make sure you whisk the egg whites till you get stiff peaks.  What are stiff peaks?  When you dip a spoon or knife or even your beater hooks into the whisked whites and pull upwards, they should form AND retain the shape of little pointy peaks.  BUT be careful not to overdo the whisking either as the whites may separate.  So, this is a really delicate operation here....
3.  Use a bit of cream of tartar to help stabilize the whisked egg whites - there is a scientific reason for this but since I suck at chemistry, just go with this explanation, ok?
4. Once whisked, start by folding only 1/3 of the egg whites into your yolk mixture.  This way, you could introduce and mix the batter first without worrying about deflating all the whites because you still have 2/3 left to add volume to the mixture.  So, after folding in the 1st third, you can add the remaining whites and fold in deftly.
5. Don't use too high a temperature for baking as the cake expands too quickly and could collapse easily.  You could follow the oven settings listed in the recipe but be prepared to adjust as oven settings can vary.

Wow, I think this is the most technical posting I have ever made regarding baking or cooking.  But thought you might find it useful if you even remotely think of making a chiffon cake.  Of course, you could save all the hassle and just go buy it at the store!  I ask myself why I bother too.  Guess it is the satisfaction of being able to actually produce it myself  - and it is nice to be able to experiment with my own variants next time.  How does Durian chiffon cake sound? Yum Yum!